Showing posts with label Ella's Design Etsy Shop. Show all posts

Wednesday, 24 February 2021

Update on my Etsy store...

Good evening, crafty buddies! As you may or may not have noticed, there are not very many items in my Etsy shop...with time and finances being so much more limited after hubby's redundancy last year and me having to work more, I have had to make the decision to switch over to craftsuprint.com to sell my designs...

Unfortunately Etsy still charges a listing fee every 3 months, regardless of whether you sell an item and with not enough sales to cover the cost and rather than stop designing all together, I have moved over to Craftsuprint.  

I still thoroughly enjoy the design process and want to continue to share my artwork with you all when time and motivation allow, so hope that you will continue to support my work and enjoy using my designs...

I have something new in the pipeline and am currently working on sample cards for a new design that I am hoping to get listed in the next couple of days, so watch this space!...

Crafty hugs,


Friday, 25 September 2020

More Wordart cards...

 Good morning, Blogger buddies! So, who says poinsettias have to be red?!...

I have to say, I really like the way this card turned out...probably because I am a sucker for frosty colour tones when it comes to festive makes. I printed two copies of the Christmas Wordart digistamp at 4" x 6" and then coloured with my Pro/Flexmarkers...

Colour list - 
Poinsettias - Pastel Blue, Denim Blue, China Blue
Holly - China Blue, Navy Blue
Mistletoe - Soft Green, Marine
Happy word and berries - Cool Grey 2 & 4

I cut out the image leaving a white border and also cut away some of the inner areas to give it a more open look. I then mounted the image on to a 5" x 7" card base that had been lightly inked with Cracked Pistachio Distress Ink and added some corners using the aqua polka dot from my Fuchsia mini kit. I decoupaged the words and used my Quickie glue pen to colour in before sprinkling with crystal glitter.

I finished off with some Liquid Pearls on the white berries and dots and added small crystal gems to the flower centres.

But what if I don't do colouring, I hear you say...well this next card is loosely coloured using Distress Inks (or any other ink pads or even chalks)...


Once again, I printed off two copies of the Christmas Wordart at 4" x 6" and gilded the word on one using my Quickie glue pen and gilding flakes, before fussy cutting with my scissors. For the second image, I used a cotton bud to apply ink over the different areas, not worrying too much about staying in the lines (but still being a little controlled in my application) and gilded the holly berries.

I added some border strips from the bonus red polka dot paper onto a 6" x 6" kraft card blank and then attached the image on top, decoupaging the wording. I added some gold line border peel offs between the layers and a couple of green polka dot corners, then finished with gold pearls, white pearls and a die cut gold bow (that just happened to be lying around on my crafty table!)

I hope you like my festive creations and that I have given you the inspiration to try different colours to the 'traditional' ones...

There's a definite Autumn nip in the air today but I'm still going to make the most of the cool sunshine and get the washing line filled. Have a fabulous Friday, whatever you're up to...

Crafty hugs,


Thursday, 24 September 2020

Christmas Wordart...

 Good afternoon, crafty friends! I have a new design to share with you today which is great for making quick and easy Christmas cards...this is now available in my Etsy store HERE...

I was totally inspired by the new Gina K incentive stamp and wanted to create my own festive version for those batch card makes...


This card uses the precoloured image and the green bonus paper that comes with it. I printed the image off at 3.5 x 5 inches and thought I would give a step by step of how I print my images for all those digital newbies or those who need a little more confidence...

 Firstly, I cut my A4 printing paper down into quarters (14.8 x 10.5cm) although this isn't exactly the same as 4x6 inches, it is close enough (for me, anyway!). I have a separate tray for smaller sizes but if you don't, just place your paper in and adjust your guides so that it is held straight for printing.


I use the default Windows program for viewing  by double clicking on the image and then click the print icon (usually looks like a little printer). In the screen above, I have highlighted the two boxes that I set in the Print window - the Paper Size to 4" x 6" and the Photo Size box to 3.5 x 5 in. You can change the copies if you wish to print multiples for batch making, or if you want to decoupage elements.


For my card - once printed, I cut the image down to 13 x 9.5cm and added a black mat just 3mm bigger (13.3 x 9.8cm). I printed the polka dot paper to A4 size (changing the photo sizes will scale the print) and cut a piece 17 x 12cm, then inked the edge with Black ink. I attached the image off set to one side and added some thin burgundy ribbon around the left side with a small bow. You can then bling up your image by adding glitter, gems and pearls...

Next I printed off the digistamp and coloured it with a slightly darker colour scheme...

At first, I coloured the 'Happy' in a light brown tone, but wasn't sure about it, so added some gold glitter...I still wasn't sure, so printed off another copy and coloured the word in a contrasting aqua tone and decoupaged it over the top...

...much better! I think aqua is probably my favourite colour  - I love to use it in my crafting (especially teamed with a contrasting pink!) and it's a colour that I like to wear, plus it's one of my favourite colours for Christmas too!

I hope you like my new image and cards, and that you found my little step by step helpful. If you purchase my design and create, please send me a link to see how you've used it either in a comment here, through Facebook, Craftworld or even send me an email contact@ellasdesign.co.uk...

Crafty hugs,


Wednesday, 16 September 2020

Nativity Window...

Forgot to post this here, so here goes...

 I have a new image in my Etsy store...this pretty Nativity Window comes in a black and white digital stamp, pale digistamp (for no lines colouring technique) and a precoloured version, for just £1.99!...and it makes the easiest of Christmas cards!...

For this simple card, I used an A6 card blank inked with Mustard Seed Distress Ink and mounted the precoloured image from the A4 sheet included onto gold card stock. A touch of gold and crystal glitter, a bit of doodling and I was finished! Super quick...

 You can find this digistamp to buy in my Etsy shop HERE ...

Thanks for looking and hope you have a wonderful Wednesday, whatever you're doing!

Crafty hugs,


Wednesday, 19 August 2020

A Jug of Daisies...

 Good afternoon, crafty friends! I have now added my Jug of Daisies digistamp and precoloured mini kit to my Etsy shop...consisting of black and pale digital stamp images, precoloured image and 3 coordinating backing papers...

 
This card uses the precoloured image, printed at Photo Size 4 x 6in. and the 3 coordinating papers...
  • 6x6in card base
  • Yellow daisy paper - 14cm square
  • White - 12.5 x 8.5cm
  • Yellow dot - 12 x 8cm
  • Cream - 14 x 4.5cm
  • Plaid - 14 x 4cm
  • Brown - 10.8 x 9.8cm
  • Image - 10.5 x 9.5cm

I printed off  2 of the image and decoupaged the jug body and some of the flowers. The edges of the papers were inked with Vintage Photo and Cracked Pistachio Distress Oxides and I added a touch of glitter to the leaves.

I'm really pleased with how this pretty image turned out and despite being precoloured in golden hues for the time of year, it also looks great in different colour ways - in blues, like my DT card for Passion for Promarkers (you can visit the post HERE)...

...or as traditional white and yellow daisies. Plus, why not print an extra digital stamp, put the image back through your printer and over print a patterned paper to paper piece the jug, as I have above.

Colour list - 

  • Flowers - Blender, Blossom, Buttercup, Mustard, Gold
  • Leaves - Apple, Grass, Forest Green
  • Jug - Blender, Cool Aqua, Duck Egg, Surf Blue, Cool Grey 2 for the shadow

I hope you like my latest design and don't forget to let me know if you create something using one of my images, as I love to see other people's creations!

This set is available to buy now in my Etsy shop for just £2.40...

Crafty hugs, 


Tuesday, 18 August 2020

Passion for Promarkers - Shades of Blue...

 Good afternoon, crafty friends! We have a brand new challenge starting today over at Passion for Promarkers and the lovely Shelly has chosen a colour theme of 'Shades of Blue'...we will accept, skin, hair and a little of other colours, but the dominant colour should be blue.

We're being sponsored by Di's Digi Stamps who are offering one lucky winner a $6 voucher to spend in their online store...

Don't forget, to be in with a chance of winning the prize, you MUST use your Letraset/Winsor & Newton mediums and follow the challenge theme - it also really helps if you can let us know where you've used them, for example, coloured with Promarkers...

For my card, I used a new image which will soon be available in my Etsy store called 'Jug of Daisies'. I coloured it up with my Pro/Flexmarkers using the following colours :

  • Flowers - Pastel Blue, Arctic Blue, China Blue, Indigo Blue, Buttercup, Mustard, Gold, Henna
  • Leaves - Apple, Grass, Forest Green
  • Jug - Pebble Blue, Cloud Blue, Blender, Khaki for shadow

I used the blue ticking paper form the cooker/washer set of Words at Play and a piece of blue floral daisy paper from my scrap drawers. A simple sentiment, dots of glitter and some flat back pearls is all I used to embellish and finish my card.

I'm slowly trying to get back into my crafting and social media...although I have been busy with card orders...we've just got a lot going on at home at the minute and so that has to take priority...

I hope you can find the time to play along with our challenge this week and look forward to seeing all of your wonderful creations...

Crafty hugs,


Monday, 27 July 2020

Peacock...

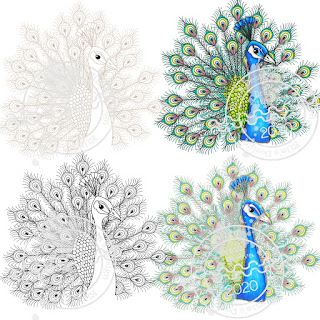
Good morning, crafty buddies! I'm here today to share a new image which has just gone live in my Etsy store...
https://www.etsy.com/uk/listing/831297660/peacock-digistamp
This pretty peacock image is available as both outline digistamp and precoloured image for the, frankly dotty price of just £1.99!... (click the image above to go to my Etsy store)


For my first sample card, I used the blue dot paper from the Buttercup mini kit and the green stripe and aqua polka dot from the Fuschia mini kit...

Navy blue - 14cm square
Blue dot - 13.5cm square
Green stripe - 12.5 x 7.5cm
White - 14 x 4.5cm
Aqua polka dot - 14 x 4cm
Blue glitter - 10.5cm square
Image - 10cm square
Gold fishtails - 2cm wide

I glittered the peacocks tail with crystal glitter and added black glitter to the 'eyes' of the tail feathers. I then created a sentiment in Photoshop using Californian and Breetty fonts, before finishing with some adhesive pearls.


For my second card, I kept it clean and simple by using the image as the main focal point of the card. I added a fun sentiment using Perpetua Titling, Breetty and Californian fonts and decoupaged the body and head of the peacock. I glittered the tail feathers with gold and black glitter, before mounting the panel onto a pearlescent aqua paper...

Don't forget to have a look in my Etsy store and see what other images I have and there'll be more to follow...

Crafty hugs,


Thursday, 9 July 2020

More daisies...

Good afternoon, my lovelies! It's another grey and dreary day here in North Wales, but I have been doing a little crafting in between household jobs...

I have created another daisy card, similar to the pink and aqua one of my last post, but this time, I embraced bolder colour tones with reds, yellow and oranges...


If you don't like using a graphics program, this card was made just using the default Windows Photo viewer...and here's how...

1. Open the Daisy no line digistamp by double clicking on it in it's containing folder (it should open in Windows Photos, unless you have changed your default settings)
2. Click Print
3. In the Print window, change the settings so that the Paper Size is 4"x 6" and the Photo Size is 3.5 x 5in
4. Place paper in the printer - I cut an A4 sheet into quarters (14.8 x 10.5cm) and although this is slightly different in size to 4x6 photo paper, I find that it is close enough. In my printer, I have a separate drawer for smaller size paper, but if not, just set the paper guards in your paper feed tray to 4"x 6" and fit the paper.
5. Change the Copies in the Print window to 3 and click Print...

I then coloured the daisy images with my alcohol markers, before cutting out with my scissors, leaving a white border. I cut away the leaves on the red flower, as I felt that there would be too many otherwise...
Colour List :
Orange flower - Pumpkin, Bright Orange, Sunset
Red flower - Sunset, Firebrick, Burgundy
Yellow flower - Lemon, Mustard, Gold
Leaves - (Spectrum Noir) Willow, Bamboo, Camo Green


I held the flowers in my hands and arranged them into a bouquet, then attached them together with a small amount of glue where the stems touched on the reverse.

Next, I prepared the white card panel (11.5 x 16.5cm) by inking with Pistachio and Peeled Paint Distress Oxides, before matting onto a rich, brown cardstock (12 x 17cm).

This time, I placed the flowers on the white side of the panel, with the coloured section to the right hand side and attached the stems with glue and the flower heads with various depth foam pads.

I finished the card by stamping a sentiment from the free stamp set of Issue #205 Simply Cards and Papercraft and matting onto the same brown cardstock, then adding some sequins, pearls and gems.

It's amazing how different the same image can look when different colour combinations are used and it was nice to get out of my pastel comfort zone for a change! I hope you've enjoyed my step by step tutorial and would love to see any creations that it inspires! Have a terrific Thursday and I hope that the sun is shining for you...

Hugs,

Wednesday, 8 July 2020

Bee Happy - Daisies...

Good afternoon, crafty buddies, from a very dark, grey and wet North Wales! I'm popping in today to share a couple more cards using my latest Etsy collection, 'Bee Happy'...

First up is a Happy 'Bee-day' card which uses the Honeycomb and orange polka dot papers and the bee coloured image from the topper sheet...


Secondly, I created this pretty daisy themed card using the no lines digistamp...


How to make it :

Open a Photo 4x6" blank page in your graphics program and add the no lines digistamp, resizing it to 85% and fitting 3 to the page, flipping one in the process. (I often cut my A4 paper into quarters and print at 4x6 Photo size as I find I save so much paper)

Colour the daisies with Pro/Flexmarkers Pale Pink, Cerise, Vermillion, Buttercup, Mustard, Gold, Meadow, Apple and Forest Green and then cut around leaving a white border.

Take a piece of white cardstock 11.5 x 16.5cm and ink a semi circle of colour on the left hand side, using Cracked Pistachio and Salty Ocean Distress Oxides. Spritz with water to soften and then once dry, mat onto a piece of green 12 x 17cm.

Lay the flowers on your card panel to see roughly where they would lie, then attach the first in place with glue and the other two with glue on the stems and foam pads behind the flowers.

Wrap some string around the card panel and secure on the back with double sided tape before adhering to the green mat and adding a string bow.

Attach the card front to a 5x7 inch card base and add a sentiment flag with text created in your graphics program, using Breamcatcher font.

Finish with some sequins gems and pearls.

I hope you like my nature inspired creations and as you can see, the photographs were taken on a much brighter day than today...Mr Sunshine had better not forget about me - I'm starting to get fed up of the lack of daylight, I need my Vitamin D!?!  Card orders are all finished and I've got one set of workshop kits put together, so one down, one to go!

Have a wonderful Wednesday evening - I'm off to stick my head in the freezer and see what's for tea!?!

Take care and crafty hugs,

Tuesday, 7 July 2020

Making Cards magazine feature...

I'm back again, dear Blogger buddies to share my crafty news!...

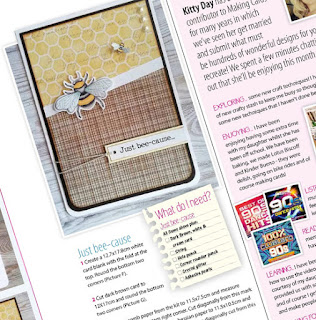
A couple of months ago, the lovely Sally Stirling from Making Cards magazine put a shout out to small businesses on Facebook, who would like to have a feature in the magazine...well, come on! No brainer!...
So I put together a collection that I had in the pipe line, made up a couple of cards and sent them off for approval, with full instructions and anything else needed...I expected to get a half page, maybe a full page, but to my surprise, I have a 3 page feature in the August edition!!...How amazing is that?!!


The cards featured use my latest 'Bee Happy' collection which features 9 coordinating papers, an A4 topper sheet, precoloured images and digital stamps in a Bee and Daisy theme...and what's better, is that it's just £2.40 from my Etsy store for the month of July!! (Going back up to £2.99 afterwards)

I'd just like to say a HUGE THANK YOU to Sally and all the team at Making Cards - you've done an amazing job and it's such an honour to be part of your publication! I hope to be able to contribute other designs in the future...

Crafty hugs,

Thursday, 21 May 2020

Anemone...

Good evening, crafty friends! I'm popping in to share a card that I made using the bonus image from my Buttercup Mini Kit...

When I'd coloured my Buttercup image up, I thought that it resembled in shape to an anemone flower, so decided to colour one up in shades of pink with dark centres...and I think that I was right....on looking again, I suppose you could even colour them red and have them as poppies too?!...
I used papers from the Wild Rose and Fuchsia kits and used the out of frame technique to cut the image. If you haven't done this before, here's a step by step of how to do it...
 1. Place your die over the image to see which parts sit outside of the cut line...
2. Cut in from the outside edge to the nearest point of each part that needs to be cut (in this case the leaves) and then cut along the image line, ensuring that you do not cut away any parts of the white area, but just cut along the image line...as shown in red above...
3. Place the die over the image (cutting side down) and ensure that the areas that you have cut are on top of the die, secure with low tack tape...
4. Put through your die cutting machine and it will cut the shape but leave the areas that were outside of the die, as above...

I then matted the image onto a cream scalloped circle die and assembled the card...

Dimensions :
Pink circle (Wild Rose kit) - 14cm square 
(edges inked with Victorian Velvet)
Pale Pink - 11.5cm square
Pink Dot (Wild Rose kit) - 11cm square
(edges inked with Victorian Velvet)
Pale Green - 14 x 3.5cm
Green Gingham (Wild Rose kit) - 14 x 3cm
(edges inked with Peeled Paint)
Green stripe (Fuchsia Mini kit) - 6 x 1.5cm and 4.5 x 1.5cm

I used one of the sentiments from the Buttercups sentiment sheet, cut with an oval die and matted onto pale pink cardstock. I added some black glitter to the centre of the flowers and a couple of pearls to finish...it just shows how different an image can look just by changing the colour tones!

I hope you like my floral make and if you create something similar, I'd love to see it!

Crafty hugs,


Buttercups...

Good morning, my lovelies! It's looking to be another gloriously sunny day here in North Wales and the fabulous weather has definitely been a help to my design work - Mother Nature is truly a talented artist! For my latest design, I found inspiration in the fabulous field of buttercups that is across the road from our house...

So I now have another brand new mini kit in my Etsy shop in homage to these pretty little cups of sunshine...

You get the digistamp and precoloured versions of the flower, 3 coordinating papers, 4x6 photo size sentiment sheet, plus a bonus image (which I'll share later), all for just £2.40...
I had to make another card in the style of the Fuchsia one I made, just because I love how it turned out and I think it works well for this pretty Buttercup image too...
https://www.etsy.com/…/…/798184702/buttercups-mini-paper-kit

Hope you like my nature inspired design and I'll be back later with a card made using the bonus image...

Crafty hugs,

Tuesday, 19 May 2020

Passion for Promarkers - 11th Anniversary challenge...

Good morning, crafty friends! It's a special week this week over at Passion for Promarkers, as it's our 11th Anniversary! I have been lucky enough to be a member of the DT for over 7 years now and would just like to thank Denise and Gina for all of their hard work over the years, bringing us together in our crafty passion!

So on to the good stuff...we have an amazing array of sponsors this week, so you're going to want to play along, plus we have a super easy theme of Spots and/or Stripes...

https://www.doctor-digi.com/
Dr Digis House of Stamps - 2 digi images, 
https://www.diestodiefor.com/

Dies to Die For - £20 voucher, 
https://marketplace.zibbet.com/leannsworld101

Leann's World 101 - 2 digis, 
https://www.uniko.co.uk/

Uniko - 1 stamp set (must be in stock), 
https://www.cowlingandwilcox.com/

Cowling & Wilcox - 12 pack of Brushmarkers set 1, 

https://www.disdigistamps.com/

Di's Digi Stamps - $6 voucher. 

Wow! What a brilliant set of prizes, just remember, that to be in with a chance of winning a prize, you MUST use your Letraset/Winsor & Newton mediums and follow the challenge theme. Also, due to it being our anniversary challenge and the possibility of high numbers entering, we need to limit the number of entries to 3 per person...

Now I don't know what came over me, but I actually made a Christmas card for my inspiration...in May!...I don't normally do Christmas until about the end of November, but I wanted to see if I could use my Flower Garland image for a festive theme...


 ...and I think it turned out alright?! I kept the colours to a traditional festive palette and added in some gold accents. I used a similar layout to the Gina K cards that I have been seeing of late and kept the background quite muted to stop it being over busy...looking at it now though, I think I need to chuck a load of glitter at it, because if you can't have glitter for Christmas, then when can you have it?!

I really hope that you can play along with our challenge this week, as there are some fantastic prizes up for grabs and look forward to hopping around Blogland to see what you have all created!

Crafty hugs,