Monday, 27 July 2020

Peacock...

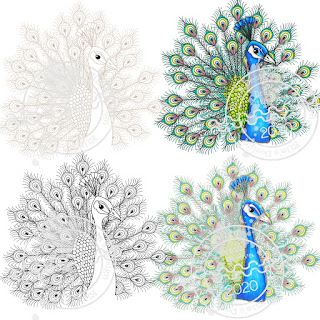
Good morning, crafty buddies! I'm here today to share a new image which has just gone live in my Etsy store...
https://www.etsy.com/uk/listing/831297660/peacock-digistamp
This pretty peacock image is available as both outline digistamp and precoloured image for the, frankly dotty price of just £1.99!... (click the image above to go to my Etsy store)


For my first sample card, I used the blue dot paper from the Buttercup mini kit and the green stripe and aqua polka dot from the Fuschia mini kit...

Navy blue - 14cm square
Blue dot - 13.5cm square
Green stripe - 12.5 x 7.5cm
White - 14 x 4.5cm
Aqua polka dot - 14 x 4cm
Blue glitter - 10.5cm square
Image - 10cm square
Gold fishtails - 2cm wide

I glittered the peacocks tail with crystal glitter and added black glitter to the 'eyes' of the tail feathers. I then created a sentiment in Photoshop using Californian and Breetty fonts, before finishing with some adhesive pearls.


For my second card, I kept it clean and simple by using the image as the main focal point of the card. I added a fun sentiment using Perpetua Titling, Breetty and Californian fonts and decoupaged the body and head of the peacock. I glittered the tail feathers with gold and black glitter, before mounting the panel onto a pearlescent aqua paper...

Don't forget to have a look in my Etsy store and see what other images I have and there'll be more to follow...

Crafty hugs,


Wednesday, 22 July 2020

Gatefold aperture card...

Good afternoon, crafty buddies! I was supposed to be tidying my craft table in preparation for our video workshop tomorrow, only I got a bit distracted by this month’s copy of Simply Cards and Papercraft!…

I noticed that one of the challenges this month in the Craftworld Forums is to create a gatefold card…well I have to admit, I haven’t made one for literally ages! Just to complicate things a little more (because I can never do anything simple!), I decided to create a gatefold aperture card and used the porthole stamp to create a frame around it….


I stamped the lighthouse and shells with Versafine and coloured with Distress inks for a change and inked some light clouds with a blending brush. I couldn’t get the porthole to stamp clearly, so added some eyelet die cuts in silver. I placed the ship’s wheel sentiment inside the card so that it aligned with the aperture and added the ‘Seas the Day’ sentiment on the front. The strip of blue anchor paper is from my Words at Play CD and I finished with my obligatory 3 grey pearls


Thanks for popping by and I hope you like my nautical creation! I'd best get back to tidying my table, as I seem to have managed to make more mess rather than clear up!

Have a wonderful Wednesday and I'll be back soon with some more craftiness!

Tuesday, 21 July 2020

Passion for Promarkers - BINGO!...

Good morning, crafty buddies! Another Tuesday rolls around, which means it's time for a brand new challenge starting over at Passion for Promarkers! I'm playing hostess this week and have given you a nice, easy BINGO board to play along with...
We are being sponsored by JMC Designs, who are offering one lucky winner a choice of 1 digital collection form their online store...
https://www.etsy.com/uk/shop/JMCDesignsArt

Just remember, to be in with a chance of winning the prize, you must use your Letraset/Winsor & Newton mediums and follow the challenge theme...it also really helps if you can tell us where you've used them, for example, coloured with Promarkers...

Lines used : Ribbon, Paper piecing, Pearls  -  Die Cuts, Image, Pearls  -  Paper piecing, Image, Spots/stripes

We were lucky enough to get an image to play with and I picked out the pretty Sunshine and Showers...perfectly typical of our British weather! I used up some more papers from my scrap drawers (although they're still not getting any lower!) and created a sentiment in Photoshop that coordinates with the theme of the image.

I added in some die cut clouds, grosgrain ribbon, gems, pearls and a touch of glitter. I paper pieced her dress bodice and decoupaged her fringe and the foremost cloud, for a bit of dimension...

I hope you can find the time to play along with my fun challenge this week and look forward to seeing all of your wonderful creations...I'm off to work, so will be back later to have a nosy round the internet...Have a terrific Tuesday, whatever you're up to!

Hugs,

Thursday, 9 July 2020

More daisies...

Good afternoon, my lovelies! It's another grey and dreary day here in North Wales, but I have been doing a little crafting in between household jobs...

I have created another daisy card, similar to the pink and aqua one of my last post, but this time, I embraced bolder colour tones with reds, yellow and oranges...


If you don't like using a graphics program, this card was made just using the default Windows Photo viewer...and here's how...

1. Open the Daisy no line digistamp by double clicking on it in it's containing folder (it should open in Windows Photos, unless you have changed your default settings)
2. Click Print
3. In the Print window, change the settings so that the Paper Size is 4"x 6" and the Photo Size is 3.5 x 5in
4. Place paper in the printer - I cut an A4 sheet into quarters (14.8 x 10.5cm) and although this is slightly different in size to 4x6 photo paper, I find that it is close enough. In my printer, I have a separate drawer for smaller size paper, but if not, just set the paper guards in your paper feed tray to 4"x 6" and fit the paper.
5. Change the Copies in the Print window to 3 and click Print...

I then coloured the daisy images with my alcohol markers, before cutting out with my scissors, leaving a white border. I cut away the leaves on the red flower, as I felt that there would be too many otherwise...
Colour List :
Orange flower - Pumpkin, Bright Orange, Sunset
Red flower - Sunset, Firebrick, Burgundy
Yellow flower - Lemon, Mustard, Gold
Leaves - (Spectrum Noir) Willow, Bamboo, Camo Green


I held the flowers in my hands and arranged them into a bouquet, then attached them together with a small amount of glue where the stems touched on the reverse.

Next, I prepared the white card panel (11.5 x 16.5cm) by inking with Pistachio and Peeled Paint Distress Oxides, before matting onto a rich, brown cardstock (12 x 17cm).

This time, I placed the flowers on the white side of the panel, with the coloured section to the right hand side and attached the stems with glue and the flower heads with various depth foam pads.

I finished the card by stamping a sentiment from the free stamp set of Issue #205 Simply Cards and Papercraft and matting onto the same brown cardstock, then adding some sequins, pearls and gems.

It's amazing how different the same image can look when different colour combinations are used and it was nice to get out of my pastel comfort zone for a change! I hope you've enjoyed my step by step tutorial and would love to see any creations that it inspires! Have a terrific Thursday and I hope that the sun is shining for you...

Hugs,

Wednesday, 8 July 2020

Bee Happy - Daisies...

Good afternoon, crafty buddies, from a very dark, grey and wet North Wales! I'm popping in today to share a couple more cards using my latest Etsy collection, 'Bee Happy'...

First up is a Happy 'Bee-day' card which uses the Honeycomb and orange polka dot papers and the bee coloured image from the topper sheet...


Secondly, I created this pretty daisy themed card using the no lines digistamp...


How to make it :

Open a Photo 4x6" blank page in your graphics program and add the no lines digistamp, resizing it to 85% and fitting 3 to the page, flipping one in the process. (I often cut my A4 paper into quarters and print at 4x6 Photo size as I find I save so much paper)

Colour the daisies with Pro/Flexmarkers Pale Pink, Cerise, Vermillion, Buttercup, Mustard, Gold, Meadow, Apple and Forest Green and then cut around leaving a white border.

Take a piece of white cardstock 11.5 x 16.5cm and ink a semi circle of colour on the left hand side, using Cracked Pistachio and Salty Ocean Distress Oxides. Spritz with water to soften and then once dry, mat onto a piece of green 12 x 17cm.

Lay the flowers on your card panel to see roughly where they would lie, then attach the first in place with glue and the other two with glue on the stems and foam pads behind the flowers.

Wrap some string around the card panel and secure on the back with double sided tape before adhering to the green mat and adding a string bow.

Attach the card front to a 5x7 inch card base and add a sentiment flag with text created in your graphics program, using Breamcatcher font.

Finish with some sequins gems and pearls.

I hope you like my nature inspired creations and as you can see, the photographs were taken on a much brighter day than today...Mr Sunshine had better not forget about me - I'm starting to get fed up of the lack of daylight, I need my Vitamin D!?!  Card orders are all finished and I've got one set of workshop kits put together, so one down, one to go!

Have a wonderful Wednesday evening - I'm off to stick my head in the freezer and see what's for tea!?!

Take care and crafty hugs,

Tuesday, 7 July 2020

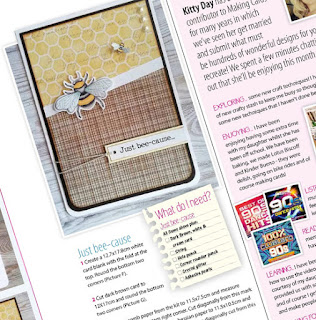
Making Cards magazine feature...

I'm back again, dear Blogger buddies to share my crafty news!...

A couple of months ago, the lovely Sally Stirling from Making Cards magazine put a shout out to small businesses on Facebook, who would like to have a feature in the magazine...well, come on! No brainer!...
So I put together a collection that I had in the pipe line, made up a couple of cards and sent them off for approval, with full instructions and anything else needed...I expected to get a half page, maybe a full page, but to my surprise, I have a 3 page feature in the August edition!!...How amazing is that?!!


The cards featured use my latest 'Bee Happy' collection which features 9 coordinating papers, an A4 topper sheet, precoloured images and digital stamps in a Bee and Daisy theme...and what's better, is that it's just £2.40 from my Etsy store for the month of July!! (Going back up to £2.99 afterwards)

I'd just like to say a HUGE THANK YOU to Sally and all the team at Making Cards - you've done an amazing job and it's such an honour to be part of your publication! I hope to be able to contribute other designs in the future...

Crafty hugs,

Passion for Promarkers - Use Orange...

Good afternoon, crafty friends! It's Tuesday, which means a brand new challenge over at Passion for Promarkers! The lovely Julie is in the hostess chair and she's given us a colour challenge of 'Use Orange'...so she would like to see the colour orange featuring somewhere on your creations (it can be as much or little as you like)...
We're being sponsored by Colour of Love who are offering one lucky winner a choice of 3 digital images from their online store...
https://www.colourofloveshop.com/

Just remember that to be in with a chance of winning the prize, you must use your Letraset/Winsor & Newton mediums and follow the challenge theme...good luck!

We were lucky enough to get an image to play with and I picked out the ever so pretty Cosmos and decided to decorate another notebook...
The papers are all scraps from my scrap drawers (I NEED to use more of these as they're starting to get rather full!) and I added some grosgrain and polka dot ribbon for a touch of softness.

I coloured Cosmos with my Pro/Flexmarkers, plus a few Spectrum Noir greens and added some Stickles and crystal glitter to her wings. I added some photo corners in a textured vintage gold and the 'notes' banner, cut with my Sizzix alphabet dies. I found a pretty filigree metal corner in one of my embellishment boxes and added this, along with a few sprinkles of flat sequins, pearl roses and pearls.

Colour List -
Flowers - Gold, Pumpkin, Bright Orange, Sunset
Leaves - SN Willow, Bamboo, Camo Green
Skin - Blush, Dusky Pink, Coral
Hair - Sandstone, Caramel, Cocoa
Dress - Satin, Soft Peach
Wings - Pastel Green, Soft Green

Despite my crafty mojo going AWOL at the moment, I have been doing other things...on Saturday, I went out and foraged some wild strawberries to make Strawberry muffins (they were DELICIOUS!) and yesterday, hubby and I went picking gooseberries and I've made gooseberry jam, plus a big pan of broccoli and Stilton soup!

I also have something exciting to share with you, but I'll do that in another post...for now, enjoy the rest of your day and if you find a crafty MOJO lurking in the cupboard or under the bed somewhere, can you please chastise it and send it home!

Hugs,