Showing posts with label flowers. Show all posts

Sunday, 11 May 2025

Navy blooms...

 Hey there, crafty friends! Today's make is inspired by the work of the super talented Yana Smakula who often uses bold colours for her backgrounds, especially when using florals...


 This card evolved rather than was made with any plan! I began with the embossed leaf panel, edges inked with black and dark blue base card, and cut out some large leaf dies that belong to my very underused pile! (These were from Paper Discovery's Harvest Leaves die set and the flowers were from Cardmaking Magic Layered Florals set) I cut a gold frame using Sizzix Geo Floral Frames to frame my favourite script sentiments (from Yana Smakula) and added the 'wishes' part with a stamp...

The gold frame is a little 'skew-whiff ', as it's really fiddly to attach, especially as I had multiple layers to try and adhere to, but as my Mam would say, "A man on a galloping horse wouldn't notice!"...I finished with some pearl sprinkles and in the flower centres...

I am determined to use all of my many die sets at least once, so this has put a couple more ticks in the boxes - now to learn NOT to keep buying more in the sales!

Thanks for dropping by today and I hope you're having a lovely weekend, whatever you're doing...

Crafty hugs,

Dies - Paper Discovery Harvest Leaves DIOB1507
Cardmaking Magic Layered Florals DIOB0480
Sizzix Geo Floral Frames 664377
Spellbinders Yana's Layered Script Sentiments 
Tiny flowers - Sizzix Tea Cups 665898
Berry Sprig die


Tuesday, 18 March 2025

Bloom cards...

 Good morning, crafty friends! Yes, it's me again! All I can think is that this spell of brighter weather and the lengthening days has given me the motivation to play in my craft room!...

Today's make was inspired by an extremely talented crafter, Mindy Farmer, who I found through the Share Handmade Kindness Facebook group and THIS was the card that inspired to create these pretty floral cards...


 And this is what I came up with...


 I picked out a combination of dies to create the flower spray and used one of my favourite sentiment stamps which is from Crafters Companion May Your Day Bloom stamp and die set...


 I started with the same blue and pink combination that Mindy used and mounted everything onto one of the last note cards that I got from The Works at a silly price. I have to say, I love the way this card turned out, so much so that I had to make it up in another colour way...


 And I have a feeling there may be more?!...


 I hope you like my die cut floral cards and if you do, can you please take a look at Mindy's Facebook and Instagram accounts @mindycraftscards - if nothing else, her pretty creations will make you smile!

Thanks for dropping by! Crafty hugs,


 Card Making Magic - Christina Griffiths Layered Florals, Sweet Dixie Christmas Rose SDD202, Sweet Dixie Daisy (think it may be discontinued), Sweet Dixie SDD102 Delicate Blossoms, Sizzix #665898 Teacups, Sizzix #663322 Rain Boot Planter, Crafter's Companion May Your Day Bloom


Saturday, 15 March 2025

Simple floral cards...

Good morning, my crafty buddies! I'm back to share a couple of simple floral cards that I created for my sending box. I often dither over sending out cards that I have spent a long time creating, especially if I feel that the recipient 'isn't bothered about cards'...there are some people that appreciate and cherish a handmade card (be it for a week or years) and then there are others that you know will put it up for a day or two and then it's going in the bin! I know that we can't expect everyone to keep our creations forever, so decided to create some more simple cards that still have the same handmade feel but without the long creation time...

I stamped some of the flowers from Christina Griffiths Spring - Summer stamp and die set and coloured them with  Distress Inks and Oxides, using stencils that I cut by hand (as the dies cut out leaving a white border). I used Carved Pumpkin, Abandoned Coral and a hint of Festive Berries on the California poppy style flower and Tattered Rose, Abandoned Coral and Festive Berries on the gerbera style flower, colouring the stems with a couple of different green alcohol markers. For the leaf I used Peeled Paint and Forest Moss...

I lightly inked the card front in an area where the flower would sit, then randomly stamped portions of script and added a hand doodled border. I tore a strip of patterned paper and attached across the bottom third of the card, placing the flowers and attaching with glue/foam pads. I used my favourite Yana Smakula sentiment dies and added a second stamped part to the sentiment, mat onto black to tie everything together. I finished off with some gem/enamel dot sprinkles and a touch of gold glitter on the poppy...

I really liked the way they turned out and need to come up with some more simple designs to send - my first one has been sent out to it's recipient already! Hope you like them too...

Crafty hugs,


Tuesday, 6 December 2022

Passion for Markers - Mega Christmas Challenge 'Use Die Cuts'...

 Hello there, dear crafty friends! I can't quite believe that it is this time of year already, but here we are at the beginning of December, preparing for Christmas and the start of a New Year! It also means that it is time for our Mega Christmas Challenge over at Passion for Markers...

This challenge will run for a whole month and ends on 3rd January 2023!  This gives all of our Design Team members a chance to take a little break over the festive season and catch up on their last minute cards and gifts...however to make up for the lack of challenges we have some fantastic prizes up for grabs!

Our theme for the Mega Christmas challenge is “use die cuts”.  We don't mind what you create for this challenge, as long as you use some die cuts and colour with your markers!  You are welcome to make Christmas creations but as the challenge will still be running after the ‘BIG’ day you can of course make any type of creation.  As time is precious for our DT at this time of year we are limiting the number of entries you can make to just 3 for this month long challenge.  

* Please remember to be eligible for our prizes you must use your markers such as Promarkers, Copics, Spectrum Noir, Karin, Zig Clean Color etc *

So now for the exciting bit – the prizes!

Dies to Die For are offering 1 lucky winner a £20.00 gift voucher

Dies to Die For logo

Uniko Stamps are offering 1 lucky winner 1 stamp set (must be in stock)

UnikoLogo

Leann’s World 101 are offering 1 lucky winner 2 digi images

Crafty Sentiments Designs are offering 1 lucky winner 3 digi images

Colour of Love digis are offering 1 lucky winner 3 digi images

All Dressed Up stamps are offering 1 lucky winner 2 digi images

Polkadoodles are offering 1 lucky winner 3 digi images

Di’s Digi Stamps are offering 1 lucky winner a $6.00 voucher

Sheepski Designs are offering 1 lucky winner 3 digi images

Wow, we are sure you’ll agree our sponsors have been super generous once again this year!  We are so grateful to have their continued support. 

We have asked both design teams to share some inspiration with you but as it such a long challenge we will be posting the inspiration from Team 1 today and then in two week’s time we will be posting inspiration from Team 2.  

So here's a look at my contribution... 

Once again, I managed to avoid that event that is looming on the near horizon and went for a pretty floral creation using a new stamp and die set that I picked up in one of the various sales?! I coloured the little flower sprigs with my Pro/Flexmarkers :

Flowers - Pink Pearl, Sorbet, Fuchsia Pink, Orchid, Wild Orchid, Amethyst, Apple Green
Vase - Pebble Blue, Blender  

I kept my card in my ever favourite CAS style with an inked background and although somewhat happy with the result, I feel it is a little off balance and everything could have done with being lower on the card...but hey, ho! I'll know for next time!...

So to re-cap the challenge will run until 3rd January 2023 and you can enter a maximum of 3 times.  Unfortunately during the Mega Christmas challenge we will not be choosing a Top 5 Passionista but this will re-commence for the first challenge in 2023.

I hope you all have a wonderful Christmas and wish you every happiness in the coming year!

Crafty hugs,


Saturday, 8 May 2021

Ruth Hamilton - Fuschias...

 Good afternoon, crafty friends! I am popping in today to share a card with you that was inspired by a wonderful card creation by the talented Ashley Ebben on behalf of Pretty Pink Posh, although I cannot for the life of me find the original post that she shared to credit it properly (but please check out her fabulous creations by clicking on her name or HERE!)...


I actually used two of Ruth Hamilton Design's digistamps in this pretty pink card - Fuchsias and Rose Bud...


I resized the Fuchsia flowers to 30% and the Rose Bud to 35% in my graphics program and coloured  with my Pro/Flexmarkers in Cerise, Shocking Pink, Vermillion, Pale Pink and a Blender pen. The leaves were coloured with my Spectrum Noir pens in Willow, Bamboo and Camo Green - I also coloured in the leaves and buds from the Rose Bud image to look like those on a Fuchsia plant and cut them all out leaving a white border. 

I cut a panel of white paper to 15 x 10cm and ink blended the edges with Tattered Rose Distress Oxide and spattered with Picked Raspberry and Peeled Paint. I attached the flowers and foliage using a combination of glue and foam pads, then stamped the word Happy from the freebie stamp set of Issue 212 of Simply Cards and papercraft using my stamp platform. 

I stamped and cut out the Birthday sentiment from my favourite Waffle Flower Crafts Happy Birthday Sentiments and attached with foam pads, then finished with a touch of glitter on the stamens of the flower and some pink dew drops...

I mat the panel onto black and white before attaching to a hot pink card base (thank you Gina K for encouraging my use of coloured card bases!)...et voila!

I love the way this card turned out, it is definitely my style and a HUGE thank you to Ashley for the inspiration...I hope you like it too!

Thanks for dropping by and have a fabulous weekend! Hugs,


Friday, 26 February 2021

Stencil Bouquet with Distress background...

Good afternoon, Blogger buddies! I am back to share another card I made using my Stencil Bouquet precoloured toppers...

I remember being at a show a good few years ago and chatting with a fellow stall holder who asked what I did, to which I replied CD/digital crafting...I will never forget her reply, that "CD (digital) crafting stunts creativity!"...

I never really understood this...digital crafting is a tool and medium that can be used alongside any other and I hope that the card I'm sharing today proves this...


I used the oval precoloured Peach topper and fussy cut some of the extra elements to decoupage onto the image (I must admit, I got a bit scissor happy and had intended to leave a white border around the decoupage elements, but inked the edges instead).

I then proceeded to make a background, inspired by the talented Gina K...I wanted it to look like an old painted wooden board and dragged Iced Spruce and Broken China Distress Oxides over the cardstock in a single direction, to give the impression of a grain. I softened some of the lines with a blending brush and added some colour in places with the brush too. I cut to size (17 x 12cm) and then inked the edges with Tuxedo Black Memento using a blending brush (how did I craft without these?!) before attaching to a 5 x 7 inch card blank.

I cut a cream and black oval using my Spellbinders Petite Oval dies and mat the image on top. I added a band of aqua blue polka dot from my scrap drawer, which was also mat onto black and attached this across the card slightly above middle, then attached the topper.

I felt I needed to bring the pink back in somewhere as the card was looking a bit dark, so cut a 1cm strip of pink polka dot, inked the edges with Abandoned Coral and attached across the bottom third of the card.

I embellished with some Dew Drops on the rose hips, diamantes to the flower centres and silver border waste to look like nail heads.

I added a stamped sentiment in two parts, matting one onto pink card and fussy cutting the other, leaving a white border...

I hope this goes to show that no individual element of crafting can ever stunt creativity, the creativity comes from what you do with those elements and enjoying the process. I have been very lucky to have some wonderful feedback and comments from fellow crafters about my creations, but it is surprising how just one negative one can stay with you forever...so remember...be kind, support and encourage!

Crafty hugs,


Stencil bouquet...

Good morning, crafty friends! The sun is shining and there's a hint of Spring in the air here in North Wales, long may it continue!...

I have another new design over at Craftsuprint, with this one being a pretty stencil style bouquet in two different colourways...


This first card uses one of the precoloured topper sheets which includes a square card front panel and then I used the extra floral elements, fussy cut with a white border, to decoupage over the top. I added the sentiment that comes on the sheet, cut with fishtail ends and mat onto cream card, then finished off with some diamantes and dew drops...


For my second card, I used the bouquet element from the peach topper sheet and fussy cut, leaving a white border. I embossed a piece of white cardstock, 13.5cm square with an XCut Circle folder and mat onto pink paper, 14cm square. I placed the elements roughly where I wanted them and then stamped the word Happy in position before attaching the floral elements using foam pads. The Birthday sentiment was stamped from Waffle Flower Crafts Happy Birthday sentiments set and then fussy cut, again leaving a white border. I added some dew drops to the centre of the small flowers and attached the panel to a cream card base...

I am really pleased with the soft, stencil style that this design has and of course is well and truly in my pastel comfort zone! I hope you like it too!...it's available over on Craftusprint HERE for just £2.00 for the precoloured topper sheet in Peach and Lilac colour tones, the black line digistamp and pale line digistamp, plus an elements sheet of individual precoloured flower and leaf elements for you to build your own bouquets...

I'll be back later with another card using this pretty set, until then have a fabulous Friday...

Hugs,


Monday, 15 February 2021

More flowers and a new technique...

I had a go at making my own layering stencil...yeah, that's harder than I thought?!! My brain couldn't switch off to it needing to be a stencil and everything ended up too spaced apart...I will know for next time that the layers allow things to be closer together and even overlap. 


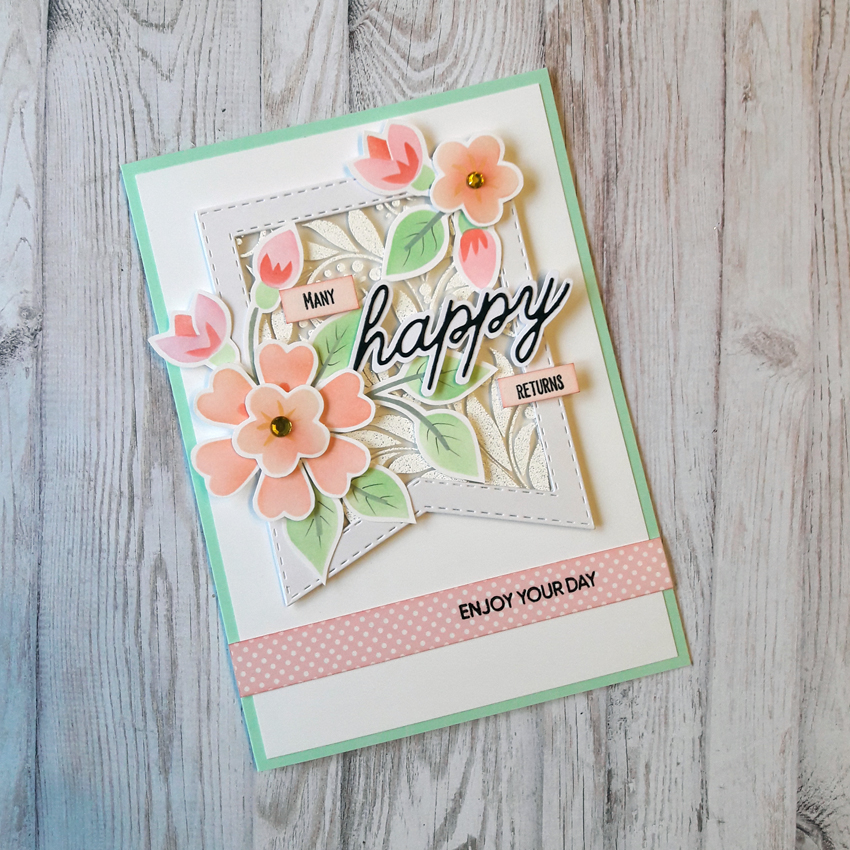
Food for thought and a work in progress, although I did like the individual elements when I cut them out and made this pretty, fresh card with them...


I've had this pretty acetate backed fishtail flag hanging around my desk for a while, actually from a festive project I was making and decided to put it to good use! I fussy cut the floral elements, leaving a white border and played around until I was happy with the arrangement. I cut the happy die in black and attached to white before fussy cutting and used the Many Happy Returns stamp that came in the Autumn stamp set of SC & P Issue 208 to create the rest of the sentiment. I also stamped Enjoy your day from the Waffle Flower Happy Birthday Sentiments stamp set...

I have to say, I do still LOVE pastel colour tones and think that this card turned out really fresh and Springlike...back in my comfort zone! 

Thanks for dropping by,


Another floral creation...

Good morning, my lovelies! Another floral card to share today using my Wild Rose digistamp...I'm not as enamored with this one, but hey, ho! Sometimes we can shuffle things around so much and still end up with something we're not sure of ...
 
 
I have been having a go at creating my own layering stencil too...will let you know how that goes in another post! 😜  


Short and sweet from me today, as I'm off to work with hubby...time to don the boiler suit! 
 
Crafty hugs,


Sunday, 14 February 2021

Slimline Anemone card...

 Good afternoon, crafty friends! I have another floral card to share today, this time using my Buttercup digistamp coloured as an anemone flower. I don't make DL cards very often but with the current trend in the US for 'slimline' cards, I thought I would jump on the bandwagon!...


 I printed the digistamp at 3.5 x 5 inches and coloured it in with my alcohol markers, before adding some black glitter to the centres. I have to say, I am embracing white at the moment and after trying different backgrounds behind the flowers, settled for a crisp, white background to really make the flowers pop! My new Waffle Flower sentiment stamps made an appearance again and following on from my last post - a black mat AND coloured card base! A pink glittered strip added some texture and sparkle and a small sentiment stamp finished everything off...

Hope you're having a lovely Valentine's Day, whether with someone or on your own and sending love and hugs to anyone that may need it...

Hugs,


Thursday, 28 January 2021

A bit of crafty time...


I picked up this Sizzix flower die a couple of years ago in the sale (it was a bargain!) but have never really known what to do with it...
 
Roll forward a couple of years and a change in crafting style and I thoroughly enjoyed inking and layering it up to create this pretty, almost stencil style, corsage! After making it up in my favourite colour tones (pink, of course!...although it is more of a coral pink?!) I decided to try it in muted tones for a sympathy type card...
 
 
 Hope you're all keeping well and enjoying a bit of crafty time, like me?! Although it's back to the grindstone and cooking tea before going to work now...and on my Birthday too!
 
Hugs,


Monday, 18 January 2021

SCP213 Tulips...

 After a conversation with the lovely Anna from workshop about using the tulip dies (that came free with this month's Simply Cards and Papercraft magazine) to make a stencil, I decided to have a go and have to say, am really pleased with the result!...


 A couple of years ago, I was lucky enough to win a Sizzix bundle from Hochanda and in it was a pack of stencil film...I cut out the different tulip dies and cut the leaves 3 times, so that I could mask off the different parts using Scotch tape and stencil each part individually...

I inked up the flowers using Tattered Rose, Abandoned Coral and Festive Berries for the pink version and Squeezed Lemonade, Wild Honey and Ripe Persimmon for the yellow/orange one and then cut them out leaving a small border.

I cut a piece of white cardstock 14.3 x 10cm and using Christina Griffiths' Fancy Flourish stencil, added a colour fade to the right hand corner in a coordinating ink. I then used a script stamp to add a bit of extra detail before matting onto a darker colour, 14.8 x 10.5cm. I used the HAPPY part of the Happy Mother's Day stamp that came with the magazine and the Birthday die cut, which I think is a Memory Box one called Decor Happy Birthday.

I attached the tulips with glue on the stems and foam pads under the flower heads and finished with a crystal dot for the 'i' and 3 pearls before matting onto a polka dot panel 16.5 x 12cm. I cut my 5" x 7" card blank down by half a centimetre widthways, so that my borders were equal...


I do like how they both turned out, but of course my favourite has to be the pink and aqua colour combo, as it's probably my favourite combination to use.

I think I'll definitely be making some more stencils and spending an hour or two inking up some tulip flowers to create some more of these simple cards...

Thanks for dropping by!


Thursday, 9 July 2020

More daisies...

Good afternoon, my lovelies! It's another grey and dreary day here in North Wales, but I have been doing a little crafting in between household jobs...

I have created another daisy card, similar to the pink and aqua one of my last post, but this time, I embraced bolder colour tones with reds, yellow and oranges...


If you don't like using a graphics program, this card was made just using the default Windows Photo viewer...and here's how...

1. Open the Daisy no line digistamp by double clicking on it in it's containing folder (it should open in Windows Photos, unless you have changed your default settings)
2. Click Print
3. In the Print window, change the settings so that the Paper Size is 4"x 6" and the Photo Size is 3.5 x 5in
4. Place paper in the printer - I cut an A4 sheet into quarters (14.8 x 10.5cm) and although this is slightly different in size to 4x6 photo paper, I find that it is close enough. In my printer, I have a separate drawer for smaller size paper, but if not, just set the paper guards in your paper feed tray to 4"x 6" and fit the paper.
5. Change the Copies in the Print window to 3 and click Print...

I then coloured the daisy images with my alcohol markers, before cutting out with my scissors, leaving a white border. I cut away the leaves on the red flower, as I felt that there would be too many otherwise...
Colour List :
Orange flower - Pumpkin, Bright Orange, Sunset
Red flower - Sunset, Firebrick, Burgundy
Yellow flower - Lemon, Mustard, Gold
Leaves - (Spectrum Noir) Willow, Bamboo, Camo Green


I held the flowers in my hands and arranged them into a bouquet, then attached them together with a small amount of glue where the stems touched on the reverse.

Next, I prepared the white card panel (11.5 x 16.5cm) by inking with Pistachio and Peeled Paint Distress Oxides, before matting onto a rich, brown cardstock (12 x 17cm).

This time, I placed the flowers on the white side of the panel, with the coloured section to the right hand side and attached the stems with glue and the flower heads with various depth foam pads.

I finished the card by stamping a sentiment from the free stamp set of Issue #205 Simply Cards and Papercraft and matting onto the same brown cardstock, then adding some sequins, pearls and gems.

It's amazing how different the same image can look when different colour combinations are used and it was nice to get out of my pastel comfort zone for a change! I hope you've enjoyed my step by step tutorial and would love to see any creations that it inspires! Have a terrific Thursday and I hope that the sun is shining for you...

Hugs,

Wednesday, 8 July 2020

Bee Happy - Daisies...

Good afternoon, crafty buddies, from a very dark, grey and wet North Wales! I'm popping in today to share a couple more cards using my latest Etsy collection, 'Bee Happy'...

First up is a Happy 'Bee-day' card which uses the Honeycomb and orange polka dot papers and the bee coloured image from the topper sheet...


Secondly, I created this pretty daisy themed card using the no lines digistamp...


How to make it :

Open a Photo 4x6" blank page in your graphics program and add the no lines digistamp, resizing it to 85% and fitting 3 to the page, flipping one in the process. (I often cut my A4 paper into quarters and print at 4x6 Photo size as I find I save so much paper)

Colour the daisies with Pro/Flexmarkers Pale Pink, Cerise, Vermillion, Buttercup, Mustard, Gold, Meadow, Apple and Forest Green and then cut around leaving a white border.

Take a piece of white cardstock 11.5 x 16.5cm and ink a semi circle of colour on the left hand side, using Cracked Pistachio and Salty Ocean Distress Oxides. Spritz with water to soften and then once dry, mat onto a piece of green 12 x 17cm.

Lay the flowers on your card panel to see roughly where they would lie, then attach the first in place with glue and the other two with glue on the stems and foam pads behind the flowers.

Wrap some string around the card panel and secure on the back with double sided tape before adhering to the green mat and adding a string bow.

Attach the card front to a 5x7 inch card base and add a sentiment flag with text created in your graphics program, using Breamcatcher font.

Finish with some sequins gems and pearls.

I hope you like my nature inspired creations and as you can see, the photographs were taken on a much brighter day than today...Mr Sunshine had better not forget about me - I'm starting to get fed up of the lack of daylight, I need my Vitamin D!?!  Card orders are all finished and I've got one set of workshop kits put together, so one down, one to go!

Have a wonderful Wednesday evening - I'm off to stick my head in the freezer and see what's for tea!?!

Take care and crafty hugs,